
Azure NetApp Files: Elevating Enterprise Data Management in the Cloud
Azure NetApp Files is a fully managed, high-performance file storage service offered by Microsoft Azure. It’s designed to address the demanding data management needs of enterprises operating in the cloud. This article explores the capabilities and advantages of Azure NetApp Files, as well as its relevance to modern cloud-based business operations.
What is Azure NetApp Files?
Azure NetApp Files is a cloud-native, scalable, and performant file storage service provided by Microsoft Azure in collaboration with NetApp, a leading data management company. It combines the power of NetApp’s advanced data management capabilities with Azure’s global reach and scalability.
Key Advantages and Capabilities
- Performance: Azure NetApp Files is engineered to deliver high-performance file storage. It provides low latencies and high throughput, making it ideal for workloads that require rapid data access, such as analytics, databases, and virtual machines.
- Global Availability: Azure NetApp Files is available in multiple Azure regions worldwide. This global reach ensures that enterprises can store and access their data close to their users and applications, reducing latency and enhancing the end-user experience.
- Scalability: It offers seamless scaling. You can start with a small deployment and easily adjust the size of your file storage as your needs evolve. Whether you require a few terabytes or petabytes of storage, Azure NetApp Files can accommodate your requirements.
- Data Management: This service provides advanced data management features, including snapshot capabilities and cloning. You can efficiently create, manage, and restore snapshots, ensuring data protection and enabling rapid recovery in case of data loss.
- Security and Compliance: Azure NetApp Files adheres to Azure’s robust security and compliance standards. It supports Azure Entra ID integration, encryption at rest, and in-transit data protection, ensuring that your data remains secure and compliant with industry regulations.
- High Availability: This service offers an SLA-backed high availability guarantee. With built-in redundancy and failover mechanisms, your data remains accessible even in the event of hardware failures or other disruptions.
Use Cases for Azure NetApp Files
- Enterprise Applications: Running mission-critical applications like SAP HANA, Oracle, and SQL Server on Azure NetApp Files ensures high performance and reliability.
- VDI and EUC: Azure NetApp Files is well-suited for Virtual Desktop Infrastructure (VDI) and End-User Computing (EUC) environments, providing fast and responsive user experiences.
- Big Data and Analytics: It’s an excellent choice for big data workloads, analytics, and data lakes where rapid data processing is crucial.
- Media and Entertainment: Azure NetApp Files is used to store, manage, and share large media files, enabling collaborative workflows in the media and entertainment industry.
- Backup and Recovery: Its snapshot capabilities are valuable for creating and managing backups and ensuring data recovery in case of data loss.
Getting Started with Azure NetApp Files
To get started with Azure NetApp Files, follow these steps:
Create a NetApp account
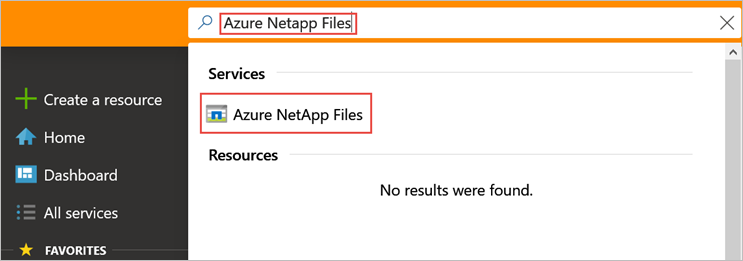
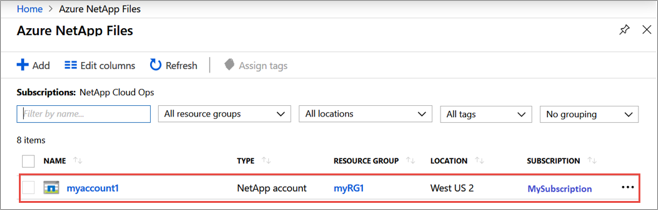
- In the Azure portal’s search box, enter Azure NetApp Files and then select Azure NetApp Files from the list that appears.
- Select + Create to create a new NetApp account.
- In the New NetApp Account window, provide the following information:
- Enter myaccount1 for the account name.
- Select your subscription.
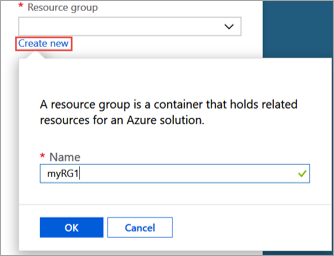
- Select Create new to create new resource group. Enter myRG1 for the resource group name. Select OK.
- Select your account location.
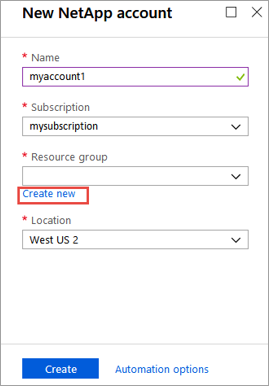
- Select Create to create your new NetApp account.
Create a capacity pool
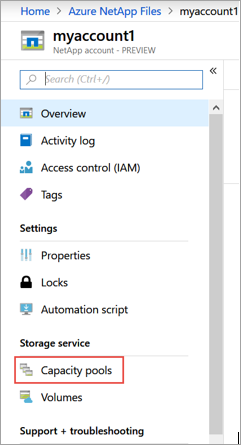
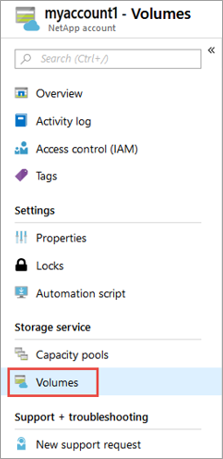
- From the Azure NetApp Files management blade, select your NetApp account (myaccount1).
- From the Azure NetApp Files management blade of your NetApp account, select Capacity pools.
- Select + Add pools.
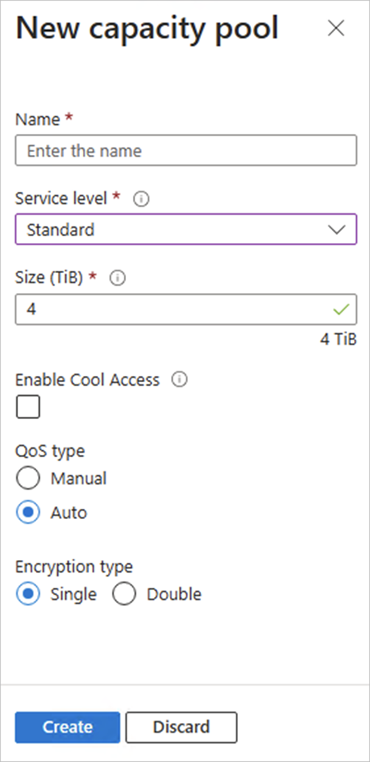
- Provide information for the capacity pool:
- Enter mypool1 as the pool name.
- Select Premium for the service level.
- Specify 4 (TiB) as the pool size.
- Use the Auto QoS type.
- Select Create.
Create an NFS volume for Azure NetApp Files
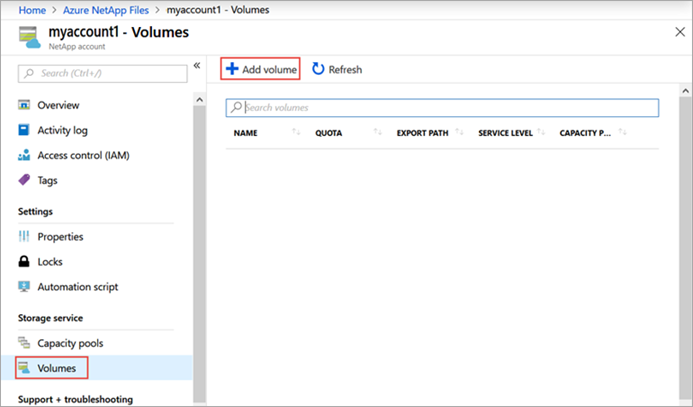
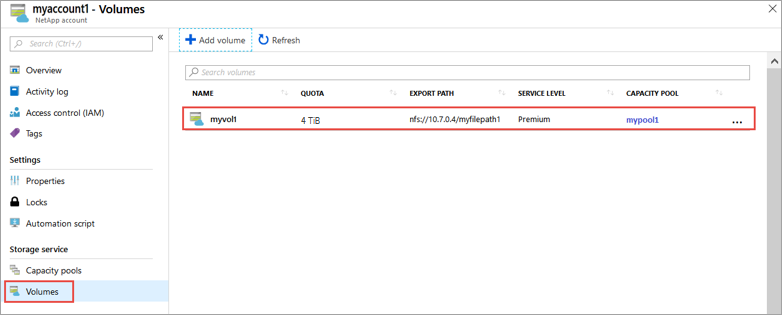
- From the Azure NetApp Files management blade of your NetApp account, select Volumes.
- Select + Add volume.
- In the Create a Volume window, provide information for the volume:
- Enter myvol1 as the volume name.
- Select your capacity pool (mypool1).
- Use the default value for quota.
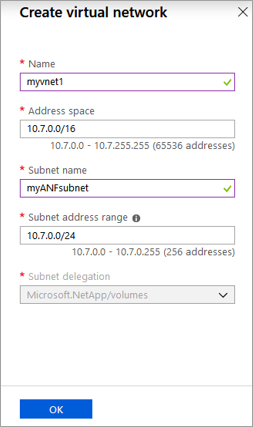
- Under virtual network, select Create new to create a new Azure virtual network (VNet). Then fill in the following information:
- Enter myvnet1 as the Vnet name.
- Specify an address space for your setting, for example, 10.7.0.0/16
- Enter myANFsubnet as the subnet name.
- Specify the subnet address range, for example, 10.7.0.0/24. You cannot share the dedicated subnet with other resources.
- Select Microsoft.NetApp/volumes for subnet delegation.
- Select OK to create the VNet.
- In subnet, select the newly created Vnet (myvnet1) as the delegate subnet.

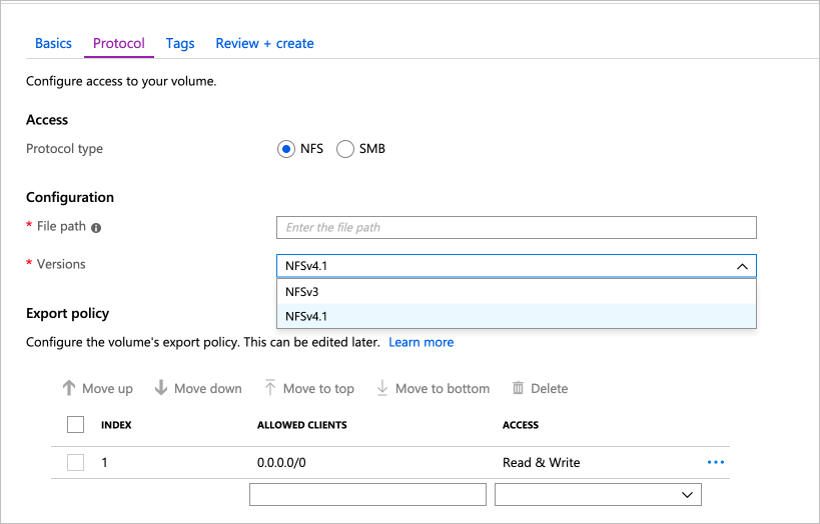
- Select Protocol, and then complete the following actions:
- Select NFS as the protocol type for the volume.
- Enter myfilepath1 for the file path used to create the export path for the volume.
- Select the NFS version (NFSv3 or NFSv4.1) for the volume. See considerations and best practice about NFS versions.
- Select Review + create to display information for the volume you’re creating.
- Select Create to create the volume. The created volume appears in the Volumes blade.
Conclusion
Azure NetApp Files provides a powerful solution for enterprises seeking high-performance, scalable, and secure file storage in the Azure cloud. Its advanced data management features, global availability, and compatibility with a wide range of enterprise workloads make it an attractive option for businesses looking to optimize their cloud-based data management strategies. Whether you need to support critical applications, big data processing, or secure file storage, Azure NetApp Files can help you meet your data management needs with efficiency and confidence.
Leave a Reply