

Validation step to check if Hyper-Threading is working correctly:
wmic CPU Get NumberOfCores,NumberOfLogicalProcessors /Format:List
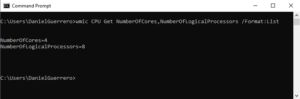
If, on the contrary, both numbers are equal, we will need to investigate why Hyper-Threading is not functioning correctly.
Understanding why Hyper-Threading is not working correctly:
It is possible to have incorrect configuration on the VM, we need to have the VM access, and see if we have installed Hyper V role as well.
Check the msconfig setting
- To launch the msconfig tool, go to CMD, type “start msconfig” and press enter.
- After reaching to the msconfig page select the second tab “Boot” and click “Advanced options…” as shown below:
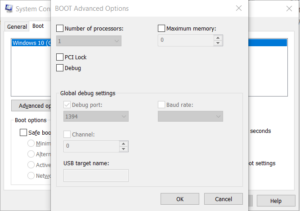
Note: Ensure that checkbox “Make all boot settings permanent” is unchecked!
If “Number of processors” setting is set to an specific number, this will be the number of cores shown by Guest OS. For example, if it is set to 2, the OS will show 2 cores regardless if the VM has more cores depending on VM size.
So you will need to set it to “1” and uncheck the box:
Press “OK”.
Then press “Apply” and “OK” on main dialogue window and the press “Restart”.
If the Number of processors setting was already set to 1 and the checkbox was unchecked, proceed with the next step.
Enabling Hyper-Threading:
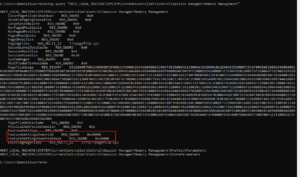
- Check current settings under FeatureSettingsOverride & FeatureSettingsOverrideMask
reg query “HKEY_LOCAL_MACHINE\SYSTEM\CurrentControlSet\Control\Session Manager\Memory Management”
Then change to the following:
reg add "HKEY_LOCAL_MACHINE\SYSTEM\CurrentControlSet\Control\Session Manager\Memory Management" /v FeatureSettingsOverride /t REG_DWORD /d 72 /freg add "HKEY_LOCAL_MACHINE\SYSTEM\CurrentControlSet\Control\Session Manager\Memory Management" /v FeatureSettingsOverrideMask /t REG_DWORD /d 3 /fThe VM will need to be rebooted from the Azure portal or command line for the change to take effect.
Note: a reboot from within the GuestOS is not sufficient!
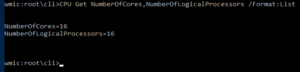
After reboot, ensure that the FeatureSettingsOverride value is still shows decimal 72 ( x48) and confirm that Hyper-Threading is working properly running the following command again in the CMD:
wmic CPU Get NumberOfCores,NumberOfLogicalProcessors /Format:List
Leave a Reply